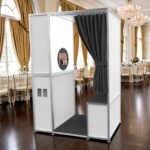
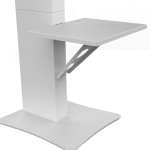
Birds Eye View / High Angle Photobooth Assembly Manual
Overview
This guide explains how to assemble and prepare the Birds Eye View / High Angle Photobooth for an event. This setup is designed to capture photos from an overhead angle, giving guests a unique editorial-style photo experience.
For best results, fully assemble and test the booth before your event starts.
What’s Included
Your setup may include:
- Tension fabric enclosure
- Overhead camera housing
- Tablet housing
- Dimmable LED constant ring light
- Xenon strobe flash
- Power cables
- Frame pieces and support hardware
- Carrying or storage components, depending on your package
Optional items may include:
- Canon R100 camera
- 11-inch iPad or tablet
- Printer
- Printer cover
- Printer catch
- Props
- Photo booth software
What You’ll Need Before Setup
Before beginning assembly, make sure you have:
- A flat and stable setup area
- Access to a standard power outlet
- At least a 6-foot extension cord
- Your iPad or tablet
- Your camera, if included
- Your photo booth software installed and ready
- Printer and print module, if printing on-site
- Enough space for guests to safely enter, pose, and exit
Safety Notes
- Always place the booth on a flat surface.
- Do not set up the booth on an uneven floor, loose carpet edge, or area where guests may bump into the frame.
- Do not force any pieces together. If a frame piece does not line up, loosen the connection, realign the part, and try again.
- Keep all power cables routed away from guest walkways. Use cable covers or tape when needed.
- Do not allow guests to hang, lean, or pull on the frame, fabric, camera housing, tablet housing, lights, or cables.
Assembly Instructions
Step 1: Unpack and Organize the Parts
Carefully remove all parts from the packaging or carrying case.
Lay the frame pieces, fabric enclosure, camera housing, tablet housing, lighting, and cables on a clean surface. Group similar parts together so they are easy to identify during setup.
Before moving forward, check that there are no damaged, bent, or missing pieces.
Step 2: Choose the Setup Location
Place the booth in the area where guests will take photos.
The best location should have:
- Enough room for the full enclosure
- A nearby power outlet
- Space for a prop table, if using props
- Space for a printer station, if printing
- Enough room for guests to enter and exit safely
Avoid placing the booth directly in high-traffic walkways.
Step 3: Assemble the Base and Main Frame
Start by placing the base or lower frame pieces on the floor.
Connect the vertical frame pieces to the base. Make sure each connection is fully seated before tightening or locking it in place.
Continue attaching the side and top frame pieces until the structure begins to form the enclosure.
Make sure the frame is standing straight and stable before moving to the next step.
Step 4: Install the Tension Fabric Enclosure
Once the frame is assembled, install the tension fabric enclosure over the frame.
Start from the top and work your way down. Carefully pull the fabric into position so it fits evenly across the frame.
Make sure the fabric is not twisted and that the entrance/opening is facing the correct direction.
Smooth out any wrinkles or uneven areas as much as possible. The fabric should be fitted securely but should not be pulled so aggressively that it strains the seams.
Step 5: Install the Camera Housing
Attach the camera housing to the overhead mounting area.
Make sure the camera housing is centered over the photo area. The camera should point downward toward the guest standing area.
Secure the housing so it does not move or shift. The overhead angle is important, so take a moment to confirm the camera position is centered before continuing.
Step 6: Install the Camera
If your package includes a Canon R100 or compatible camera, place the camera into the camera housing.
Make sure the camera is powered off while installing it.
Confirm the following:
- Camera is seated securely
- Lens is facing downward
- Lens cap is removed
- Camera battery or dummy battery is installed
- Camera data cable is connected
- Camera is set to the correct shooting position
- Camera is selected inside your photo booth software
Once installed, power on the camera and confirm it stays on.
Step 7: Install the LED Ring Light
Attach or position the dimmable LED constant ring light around the camera area as shown in the setup video.
Connect the light to power, then turn it on.
Adjust the brightness using the dimmer control. Start at a medium brightness level and adjust after taking a test photo.
The ring light helps keep the photo area evenly lit and improves the overall image quality.
Step 8: Install the Xenon Strobe Flash
Install the xenon strobe flash in the correct mounting position.
Connect the hot shoe to the Camera on top.
Take a test photo to confirm the flash fires at the correct time.
If the flash does not fire, check the hot shoe, sync cable, flash power, and camera/software settings.
Step 9: Install the Tablet Housing
Attach the tablet housing to the designated area of the booth.
Insert the tablet or iPad into the housing and make sure it is seated securely.
Connect the charging cable if needed. Make sure the cable is routed cleanly and does not interfere with guests or moving parts.
Open your photo booth software and prepare the event session.
Step 10: Connect Power
Connect the booth lighting, tablet charger, camera power, and any additional accessories to a power source.
Use a safe extension cord if the outlet is not close enough.
Before allowing guests to use the booth, confirm that:
- Cables are not loose
- Cables are not in the guest walkway
- All power connections are secure
- Lights and camera stay powered on
- Tablet remains charged or plugged in
Step 11: Open and Test the Photo Booth Software
Open your preferred photo booth software on the tablet or computer.
Confirm the following settings:
- Correct camera is selected
- Photo orientation is correct
- Overlay/template is loaded
- Sharing settings are ready
- Printer settings are ready, if printing
- Countdown and capture settings are correct
Run at least one full test session before the event starts.
Step 12: Center the Photo Area
Have someone stand inside the booth and look up toward the camera.
Take a test photo and check the framing.
Adjust the camera housing or guest standing position if needed. The subject should be centered in the photo with enough space around the edges.
For best results, place a small floor marker where guests should stand. This helps keep photos consistent throughout the event.
Step 13: Final Event Check
Before opening the booth to guests, complete this checklist:
- Frame is secure
- Fabric is properly installed
- Camera is mounted and powered on
- Lens cap is removed
- Ring light is on
- Flash is firing
- Tablet is secure
- Software is running
- Test photo looks correct
- Sharing or printing has been tested
- Cables are safely routed
- Props are placed nearby, if using props
Once everything is confirmed, the booth is ready for use.
How Guests Should Use the Booth
Guests should step inside the enclosure, look up toward the camera, and follow the prompts on the tablet.
Encourage guests to stand near the center of the photo area for the best framing.
For group photos, guests should stand close together and look upward toward the camera.
Troubleshooting
Camera Is Not Showing in the Software
- Check that the camera is powered on and not asleep.
- Confirm the camera data cable is fully connected.
- Make sure the correct camera is selected in the photo booth software.
- Confirm the camera is set to shooting mode.
- Restart the software and reconnect the camera if needed.
Photos Are Too Dark
- Increase the ring light brightness.
- Confirm the flash is firing.
- Check the camera exposure settings.
- Make sure the guest is standing in the correct photo area.
Photos Are Too Bright
- Lower the ring light brightness.
- Reduce flash power if your flash allows adjustment.
- Check camera exposure settings.
- Take another test photo before continuing.
Photos Are Not Centered
- Adjust the camera angle or camera housing position.
- Make sure guests are standing in the center of the booth.
- Add a small floor marker to guide guests.
- Run another test photo after making adjustments.
Ring Light Is Not Turning On
- Check the power cable.
- Check the dimmer control.
- Confirm the power outlet is working.
- Try a different outlet or extension cord.
Flash Is Not Firing
- Check that the flash is powered on.
- Check the sync cable or hot shoe connection.
- Confirm flash settings inside the camera/software setup.
- Make sure the camera is triggering the flash during capture.
Tablet Does Not Fit Properly
- Confirm that the tablet size matches the housing.
- This setup is designed for an 11-inch iPad/tablet configuration.
- Do not force a tablet into the housing if it does not fit.
Fabric Looks Loose or Uneven
- Confirm the frame is fully assembled and locked into place.
- Remove and reinstall the fabric, starting from the top.
- Make sure the fabric is aligned correctly before pulling it down over the frame.
Maintenance Tips
- Store the booth in a dry, clean location.
- Keep the fabric folded neatly when not in use.
- Wipe the frame with a soft cloth after events.
- Keep the camera lens clean.
- Check cables regularly for wear or damage.
- Test the booth before every event.
Recommended SEO Details
SEO Title
How to Set Up the Birds Eye View High Angle Photobooth
URL Slug
birds-eye-view-high-angle-photobooth-setup-guide
Meta Description
Learn how to assemble, power on, test, and troubleshoot the Birds Eye View / High Angle Photobooth by ATA Photobooths.
Suggested Tags
High Angle Photobooth, Birds Eye View Photobooth, ATA Photobooths, Photobooth Setup, Overhead Photobooth, Canon R100 Photobooth, iPad Photobooth Setup