Setup & Installation Guide
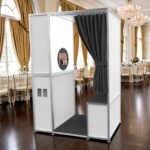
The Allure Wooden Photo Booth is designed to provide a professional photo booth setup inside a premium wooden enclosure. This guide will walk you through what comes with the photo booth shell, what additional equipment you will need, and how the different components work together to complete your system.
1. Before You Begin
Before assembling and setting up your Allure Wooden Photo Booth, make sure you have enough room to safely unpack the booth and access the front and rear of the unit.
We recommend completing the initial setup before your first event so you have enough time to install your equipment, connect your cables, install your photo booth software, and complete several test sessions.
2. What Comes With the Allure Wooden Photo Booth Shell
The Allure Wooden Photo Booth shell provides the main structure of the photo booth.
Depending on the configuration ordered, your Allure setup will include the primary wooden booth enclosure and the hardware needed to install your equipment inside of the booth.
The main booth is composed of:
- Wooden Allure Photo Booth body
- Front display/iPad mounting area
- Rear monitor/display area
- Hot Shoe
- Sync Cord
- External Flash
- Flash Rod
- Beauty Dish or Studio Umbrella
- USB Hub
- Printing Module (if iPad is used for booth)
- DSLR Camera
- Camera Data Cable (from Camera to USB Hub)
- Base and support structure
- Required assembly hardware
Important: The exact components included with your order will depend on whether you purchased a DIY Shell or a Full System Package.
3. Equipment Needed to Complete the Photo Booth
If you purchased the Allure as a DIY Shell, you will need to provide the electronics and other equipment used to operate the photo booth.
A complete Allure system may require:
iPad
The iPad acts as the main photo booth interface.
The iPad is used to:
- Run your photo booth application
- Display the live camera or photo booth interface
- Allow guests to start a session
- Review photos
- Select sharing or printing options
The exact iPad model must be compatible with the faceplate or mounting system installed in your Allure.
Photo Booth Software
You will need photo booth software installed on the iPad.
Depending on your preferred workflow, compatible photo booth applications may include software such as:
- Booth.Events
- LumaBooth
- Other compatible iPad-based photo booth applications
Your photo booth software controls the guest experience, including:
- Photo sessions
- Templates
- GIFs
- Boomerangs
- Sharing
- Printing
- Event galleries
Software subscriptions are generally managed directly through the software provider.
Camera
Depending on your Allure configuration, the booth may use the iPad’s built-in camera or an external DSLR/mirrorless camera.
If your system is configured for an external camera, additional equipment may include:
- Compatible Canon camera
- Camera mounting bracket
- USB/data cable
- Camera power adapter or dummy battery
- Camera-to-iPad connection hardware
Make sure the camera is securely mounted before operating the booth.
Flash / Lighting
If your Allure is configured with an external camera and flash system, you may also need:
- Flash unit
- Flash mounting hardware
- Hot shoe adapter
- Flash synchronization cable
- Power cable
The flash provides consistent lighting for photographs regardless of the lighting conditions at the event.
Rear Monitor
The Allure includes a rear display area designed to provide an additional visual element to the photo booth.
The rear monitor can be used to display:
- Branding
- Event graphics
- Slideshows
- Promotional content
- Videos
- Guest-facing content
The rear monitor is part of the Allure booth structure and can remain turned off if you do not want to use it during an event.
Printer
Printing is optional.
If you would like guests to receive physical prints, you will need a compatible professional photo printer.
Common photo booth printers include:
- DNP RX1HS
- DNP DS620A
- DNP QW410
The printer is normally positioned separately from the Allure photo booth.
Printing Connection
If you are operating the booth from an iPad, the printer normally requires an additional printing device or network connection.
Depending on your setup, this may include:
- Printio
- DNP WCM Plus
- Another compatible iPad printing solution
A direct wired printing setup can also be configured for installations where Wi-Fi is unreliable.
4. How the Complete System Works
Once everything is installed, the basic system works like this:
Guest → iPad / Photo Booth Software → Camera → Photo → Photo Booth Software → Sharing and/or Printer
If an external camera is installed, the photo booth software communicates with the camera to capture the photograph.
The completed image is then returned to the photo booth software where the customer’s template, graphic, or other event design is applied.
From there, the guest may be able to:
- View their photo
- Send the photo by text or email
- Scan a QR code
- Print the photo
- Start another session
The exact options available depend on the photo booth software being used.
5. Recommended Equipment Checklist
Before beginning the installation, confirm that you have:
- Allure Wooden Photo Booth shell
- Booth assembly hardware
- Compatible iPad
- iPad charger/power cable
- Photo booth software chosen/installed
- Compatible camera, if using an external camera
- Camera USB/data cable
- Camera power adapter/dummy battery
- Flash, if applicable
- Flash synchronization cable/hot shoe
- Rear monitor connections
- Required USB cables
- Power cables
- Power strip or internal power distribution
- Photo printer, if offering prints
- Printio, WCM Plus, or other printing connection
- Printer media
- Test photo template
- Internet connection, if required for your software or sharing features
6. Recommended Setup Order
For the easiest installation, we recommend setting up the Allure in the following order:
Step 1 — Position the Booth
Place the Allure on a level, stable surface.
Make sure there is enough room behind the booth to access the internal equipment and cables during installation.
Step 2 — Connect Booth Power
Locate the Allure’s internal power connections.
Connect the booth to a properly grounded wall outlet.
Do not power everything on until the main equipment has been installed and the connections have been checked.
Step 3 — Install the iPad
Install the compatible iPad into the front mounting area.
Make sure:
- The iPad is centered correctly.
- The screen is properly aligned with the opening.
- The front-facing camera is not obstructed.
- The charging cable is connected.
- The iPad is securely held in position.
Step 4 — Install the Camera
If your Allure uses an external camera:
- Attach the camera to the internal camera bracket.
- Tighten the mounting hardware.
- Connect the camera’s data cable.
- Connect the dummy battery or power adapter.
- Confirm that the lens is centered correctly with the booth opening.
Do not overtighten the camera mounting hardware.
Step 5 — Install and Connect the Flash
If your booth uses an external flash:
- Secure the flash in its designated location.
- Connect the flash synchronization cable.
- Connect the hot shoe adapter when required.
- Connect flash power.
- Verify that the flash fires when a photograph is taken.
Step 6 — Connect the Rear Monitor
Connect the rear display to its power and video source.
Turn the monitor on and verify that the desired content displays correctly.
If you do not plan to use the rear display, it can remain powered off.
Step 7 — Set Up the Printer
If you are offering prints:
- Position the printer in a stable location.
- Load the correct printer media.
- Connect the printer to the Printio, WCM Plus, computer, or other printing device being used.
- Connect your iPad or photo booth software to the printing system.
- Complete a test print.
Step 8 — Configure the Photo Booth Software
Open your photo booth application and create or load your event.
Confirm:
- Camera selection
- Photo orientation
- Template
- Countdown
- Flash settings
- Sharing settings
- Print settings
- Number of prints
- Print size
Step 9 — Test the Entire System
Before using the Allure at an event, perform several complete test sessions.
Test:
- Touchscreen response
- Camera connection
- Camera framing
- Flash
- Photo quality
- Template placement
- Rear monitor
- Text/email sharing
- Printing
- Printer alignment
- Cable connections
We recommend completing multiple test sessions before transporting the booth to an event.
7. Before Every Event
Before leaving for an event, verify that you have all necessary equipment and cables.
Power on the complete system and run at least one full test session.
Never assume that a system that worked at the previous event is automatically ready for the next event.
Confirm the camera, iPad, software, flash, printer, and sharing functions before guests begin using the booth.
8. After Every Event
After the event:
- Close the photo booth application.
- Shut down or power off the iPad when appropriate.
- Turn off the rear monitor.
- Turn off the camera.
- Turn off the flash.
- Turn off the printer.
- Shut down the booth.
- Disconnect power before packing or servicing equipment.
- Inspect cables and connections for damage.
- Charge any portable equipment before the next event.
ATA Photobooths Technical Support
If you are unsure about a component, cable, connection, or installation step, take clear photos of the area you are working on before disconnecting equipment.
This makes it easier for ATA Photobooths Technical Support to identify the components and guide you through the correct setup.
When contacting support, please provide:
- Your name
- Allure Photo Booth model/configuration
- Photo booth software being used
- iPad model
- Camera model, if applicable
- Printer model, if applicable
- Photos or video of the issue
- A description of what happens when the system is powered on
ATA Photobooths