Lumia M Pro Setup Guide
Step-by-Step Instructions
- Unpack the Lumia M Pro:
- Ensure you have the photo booth in its case, the printer and travel case, USB cable, power cable, printer paper roll, color ribbon, and a power extension cable (not included).
- Set Up the Printer:
- Refer to the video link for your specific printer model to set it up.
- Assemble the Photo Booth:
- Open the photo booth case and remove the base plate.
- Attach the lower column section to the base plate and tighten securely.
- Insert the second column, ensuring proper alignment.
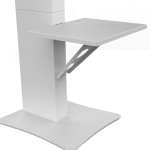
- Choose the printer shelf location and secure it with the screw knobs.
- Insert the cross members to stabilize the structure and tighten all knobs.
- Mount the head unit and secure it with the remaining screw knobs.
- Install the Printer:
- Place the printer on the shelf.
- Open the back door of the booth and connect the printer’s USB cable to the hub and the power cord to the outlet strip.
- Run the cables through the column and connect them to the printer.
- Turn on the printer.
- Install the Camera:
- If the camera is not already installed, retrieve it from the column and follow the provided link for installation instructions.
- Connect the Power:
- Run the power extension cable through the column and plug it into a wall outlet.
- Flip the power switch on.
- Prepare for Operation:
- Turn on the tablet and lift the bounce card.
- Activate the constant light ring by tapping and holding the touch sensor to adjust intensity.
- Explore the Photo Booth Components:
- Windows tablet: Turn on using the power button.
- DSLR camera with dummy battery for continuous power.
- Hot shoe for strobe flash trigger.
- USB input, LED controller, and power supplies for the ring light and LED edge lighting.
- Launch the Software:
- Open the “DSLR Booth” photo booth app on the tablet.
- Check the printer status indicator for readiness and remaining prints.
Congratulations! You have successfully set up your Lumia M Pro photo booth. If you have any questions or need assistance, feel free to contact us. Now, enjoy creating memories and taking amazing photos!