The math looks compelling at first: buy an iPad here, an enclosure there, find a ring light on Amazon, and piece together a photo booth setup for less than a full system package. Experienced operators hear this plan regularly from people who are about to spend more time and money than a turnkey system would have cost — and launch months later than they needed to.
This guide is the honest breakdown: what you actually get with each approach, what the DIY photo booth route truly costs (including what most people don’t count), and when each path actually makes sense for your situation.
In This Guide
- Package vs. DIY: What You Actually Need
- The True Cost of DIY
- The Hidden Time Cost
- What a Full System Package Delivers
- Side-by-Side Comparison Matrix
- When DIY Actually Makes Sense
Package vs. DIY: What You Actually Need to Get Operational
Most new operators underestimate the component list — which is the first reason DIY estimates come in lower than the real final number. Before comparing costs, here’s what a complete, operational photo booth setup actually requires.
|
DIY Route
Sourced separately from multiple vendors
|
Full System Package
Pre-matched, tested, and ready to deploy
|
|---|---|
|
✓
iPad Pro 12.9″
Usually included in initial plan
|
✓
Commercial-grade enclosure
Matched to package — no compatibility guesswork
|
|
!
Enclosure / shell
Often the first budget cut — cheap shells hurt pricing power
|
✓
Professional ring light or LED panel
Pre-positioned and tested with the enclosure
|
|
✓
Ring light or LED panel
Consumer lights often need extra brackets to mount properly
|
✓
All mounting hardware included
Engineered for the specific enclosure — not generic brackets
|
|
!
Software subscription
Often forgotten in initial budget; $49–$99/mo ongoing
|
✓
Integrated cable management
Routed internally — professional appearance, no trip hazards
|
|
✕
Compatible mounting hardware
Rarely included with budget enclosures; bought separately
|
✓
Transport cases / carry system
Designed for the specific components
|
|
✕
Cable management & power
Consumer extension leads look unprofessional at events
|
✓
Backdrop stand (select packages)
Matched height and footprint for the booth type
|
|
✕
Backdrop stand & backdrop
Frequently omitted from first estimates
|
✓
Software guidance & setup support
Vendor support for recommended software platforms
|
|
✕
Transport cases
Without proper cases, gear gets damaged in transit
|
✓
Pre-tested compatibility
Everything works together before it ships
|
|
✕
Setup & software support
You’re on your own — forums and YouTube are your help desk
|
✓
Post-sale support from one vendor
Single point of contact vs. five separate suppliers
|
The ✗ items on the DIY side are almost never in a new operator’s initial budget — they’re discovered during setup and in the first few events. By the time a DIY setup is fully operational and professional-looking, the gap with a turnkey package has typically narrowed significantly.
The True Cost of DIY — Hidden Expenses Most New Operators Miss
The initial DIY estimate looks lean because it only includes the items the buyer is thinking about. The final DIY cost — once the setup is actually complete and professional — is almost always higher.
| COMPONENT | DIY COST (REALISTIC) | FULL SYSTEM PACKAGE |
|---|---|---|
| iPad Pro 12.9″ | $1,099–$1,299 |
Operator supplies
Same cost either way — no difference here
|
| Enclosure / Shell |
$400–$900
Budget-tier; commercial-grade adds $1,500–$2,500
|
Included
Commercial-grade aluminum in all ATA packages
|
| Ring Light / LED Panel |
$80–$200
Consumer-grade; professional adjustable = $200–$400
|
Included
Pre-matched and tested with enclosure
|
| Mounting Hardware |
$40–$120
Generic brackets; often wrong size on first purchase
|
Included
|
|
Cables, Power & Management |
$60–$150
Surge protector, extension leads, velcro ties
|
Included
Integrated internal routing channels
|
| Backdrop Stand |
$60–$150
Frequently omitted from initial DIY estimates
|
Included (select packages)
|
| Transport Cases |
$80–$250
Generic cases often don’t fit components well
|
Included
Designed for the specific components
|
| Software (Year 1) |
$590–$1,190
$49–$99/mo × 12 months
|
$590–$1,190
Same — software is always separate on both paths
|
|
Replacement / Upgrade Costs (Yr 1) |
$150–$500
Wrong-size brackets, budget shell wear, incompatible parts
|
$0
Tested system — no post-purchase compatibility surprises
|
|
Total (excl. iPad & software) | $830–$2,270+ | $2,200–$4,000 |
The Real Gap
A fully operational DIY setup with commercial-grade components costs $2,000–$3,500+. A full system package at the same quality tier costs $2,200–$4,000. The actual price difference is often $200–$500 — not the $1,000+ most operators expect going in.
The gap exists — but it’s much smaller than most operators expect when both sides use comparable quality components. The meaningful price difference in DIY setups almost always comes from using lower-quality components (cheaper enclosure, consumer ring light) — which creates a different kind of cost in lost pricing power and faster replacement cycles.
The Hidden Time Cost — Research, Integration & Troubleshooting
The financial comparison doesn’t capture the cost that actually derails the most new operators: time. Every hour spent researching components and troubleshooting compatibility is an hour not spent booking events or building venue relationships. For a business where the first few bookings are critical to building momentum, launch delays are expensive.
Component Research & Sourcing
Finding the right enclosure, confirming it fits your iPad model, checking if the mounting system supports your ring light, verifying the whole assembly fits in your vehicle — and doing all of this across multiple vendor websites with no reference point for what “commercial-grade” actually means in practice.
Assembly & Integration Testing
Assembling components from multiple vendors for the first time rarely goes smoothly. A bracket is 2mm too wide. The cable routing requires a drill. The ring light sits too close for the enclosure depth. Each problem requires a new order, a return, and another attempt. First-time DIY assembly typically requires 2–4 full sessions before the setup is event-ready.
Software Configuration & Troubleshooting
Photo booth software is powerful, but configuring it from scratch — templates, delivery settings, SMS integration, printer pairing — takes time even with documentation. Without a vendor who knows your specific setup, every problem leads to a forum search or a 48-hour support ticket response. Package buyers have a direct line to someone who knows exactly which software version works with which iOS version in their specific enclosure.
Launch Delay
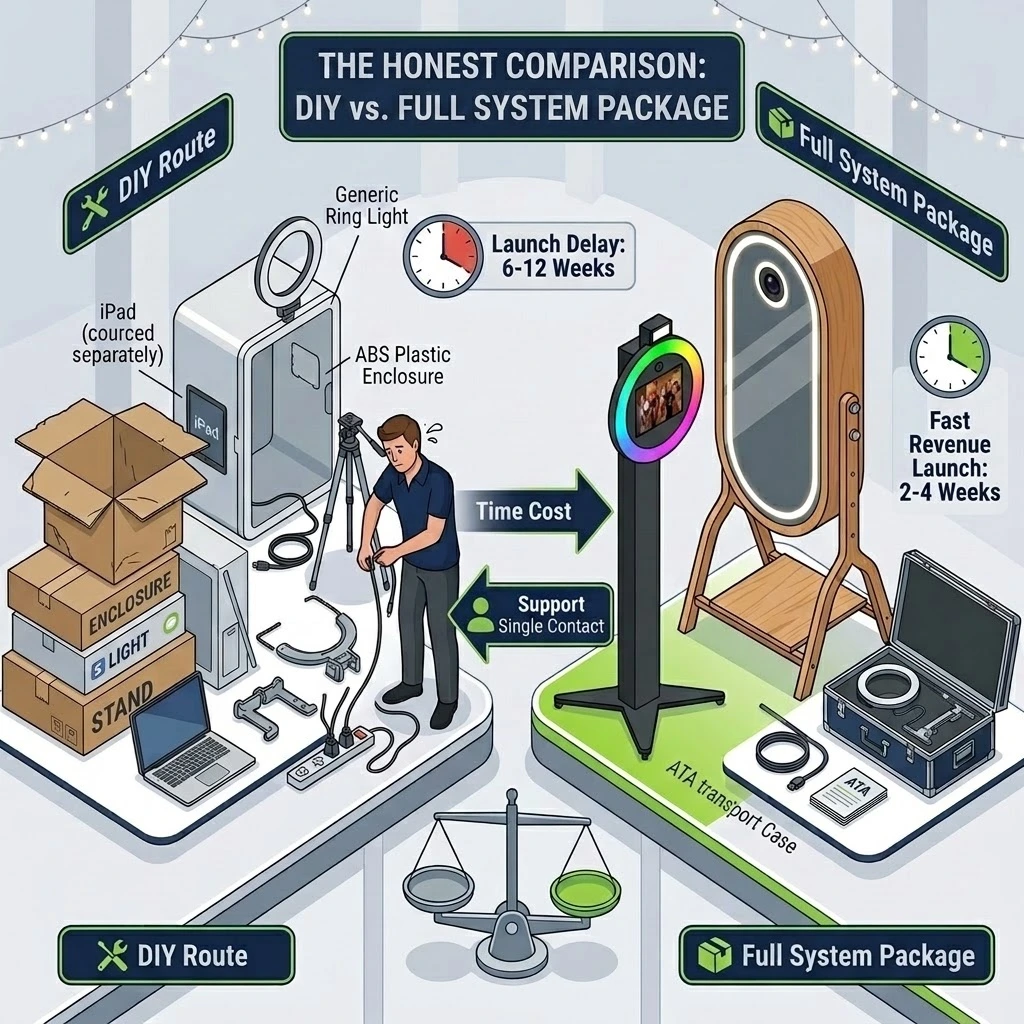
The cumulative effect of research time, component wait times (returns and reorders), and assembly iteration is a launch delay most new operators don’t account for. A DIY operator who starts sourcing in week one is realistically not booking paid events until week 6–10. A package buyer who orders week one is often booking by week 3. Those missing weeks represent $1,000–$3,000+ in early revenue that never happens.
What a Professional Full System Package Actually Delivers
A photo booth turnkey package from a specialized vendor isn’t just components in a box — it’s a system that has been tested together, configured for the specific use case, and backed by people who understand the photo booth business.
Pre-Tested Compatibility — No Surprises
Every component has been tested together. The enclosure depth accommodates the ring light distance. The mounting hardware is rated for the iPad and accessories. You don’t discover compatibility problems mid-event.
Commercial-Grade Build Quality — Guaranteed
Professional package vendors specify their enclosure materials. You know exactly what you’re getting — extruded aluminum, engineered composites, or steel — not whatever marketplace algorithm serves up under “photo booth enclosure.”
Faster Revenue Launch
The 4–8 week head start a package buyer has over a DIY operator represents real, bookable revenue. At $500–$1,500 per event, a 4-week launch advantage is worth $1,000–$6,000 in events that happen on a real calendar before the DIY operator is ready.
Professional Presentation from Day One
Package setups are designed to look cohesive and intentional. From a client’s perspective, the setup communicates immediately that they’re dealing with a professional operator — which matters for pricing power, venue referrals, and corporate clients.
Single Point of Support
When something goes wrong at 7pm on a Saturday before a 2,000-person event, you call one vendor who knows your exact setup. With DIY, you’re calling the enclosure vendor, the light vendor, and searching Reddit simultaneously.
Financing Eliminates the Upfront Gap
The price difference between a well-specced DIY setup and a comparable professional package is often $300–$700. With equipment financing, that’s $25–$60/month — offset by a single event’s revenue. The “save money by DIY-ing it” logic breaks down entirely when financing is available.
Full System Package vs. DIY — Side-by-Side Comparison
| FACTOR | DIY SETUP | FULL SYSTEM PACKAGE |
|---|---|---|
| Upfront Price (comparable quality) | $2,000–$3,500+ | $2,200–$4,000 |
| Upfront Price (budget components) | Lower ↗ | $2,200–$4,000 |
| Time to First Paid Event | 6–12 weeks | 2–4 weeks |
| Component Compatibility Guaranteed | ✗ | ✓ |
| Commercial-Grade Enclosure Guaranteed | ✗ (depends on choices) | ✓ |
| Professional Visual Presentation (Day 1) | ✗ (requires iteration) | ✓ |
| Integrated Cable Management | ✗ | ✓ |
| Transport Cases Included | ✗ (usually extra) | ✓ |
| Software Subscription Included | ✗ | ✗ |
| Single Vendor Support | ✗ (multiple vendors) | ✓ |
| Financing Available | ✗ | ✓ |
| Full Customization Freedom | ✓ | Partial |
| Year-1 Replacement Cost Risk | $150–$500 | $0 |
When DIY Actually Makes Sense — and When It Doesn’t
This guide is produced by a company that sells photo booth packages, so let’s be direct: there are genuine situations where DIY is the smarter choice.
- ✅ DIY Makes Sense When…
You’re an experienced operator expanding a second or third unit and you know exactly which components work together from prior experience. You’re not guessing on compatibility — you’re replicating a system you already understand. - ✅ DIY Makes Sense When…
You have a specific technical requirement that no package on the market addresses — a custom footprint, a specialized DSLR configuration, or a unique aesthetic. If the package doesn’t exist for what you’re building, you have no choice but to source it. - ✅ DIY Makes Sense When…
You have a technical background and enjoy the build process — and you’re not in a hurry to launch. If you have 8–12 weeks before your first target event date, DIY gives you more control and marginal savings at comparable quality. - ❌ DIY Doesn’t Make Sense When…
You’re a first-time operator who wants to launch quickly. The research time, compatibility issues, and assembly iteration of a first DIY build add weeks to your launch and often cost nearly as much as a comparable package once all hidden components are accounted for. - ❌ DIY Doesn’t Make Sense When…
Your budget plan relies on a cheap enclosure to make the numbers work. A budget shell limits your pricing power, ages out of professional use within 12–18 months, and doesn’t get you on venue preferred vendor lists. - ❌ DIY Doesn’t Make Sense When…
You’re planning to finance the purchase anyway. If you’re financing, the difference between a commercial-grade DIY build and a full system package is often $25–$60/month — offset by one event. The “save money by DIY-ing it” logic disappears entirely. - ❌ DIY Doesn’t Make Sense When…
You’re targeting corporate clients or premium venues from the start. Corporate clients evaluate your setup visually. A cohesive, professional package presentation signals the tier of professionalism your pricing needs to justify.
The Honest Test
Ask yourself: “Am I choosing DIY because it’s genuinely the smarter choice for my situation — or because the upfront number feels lower?” If it’s the second, run the full cost comparison above with commercial-grade components on both sides. The real gap is usually much smaller than the initial number implies.